Deploying Ceph: Lab, cephadm, Ansible and Rook
TL;DR this chapter in a few lines
- Try every important change in a cheap, rebuildable lab first.
- cephadm is declarative and reconciles toward the specs you apply; ceph-ansible was imperative.
- Describe the whole cluster in a spec file, keep it in Git, and use cephadm-ansible for host prerequisites.
- Rook runs Ceph inside Kubernetes from CRDs, with ceph-csi for RBD and CephFS volumes; check the production readiness list before the real bootstrap.
11-1 Before you start#
11-1-1 What questions does this chapter answer?#
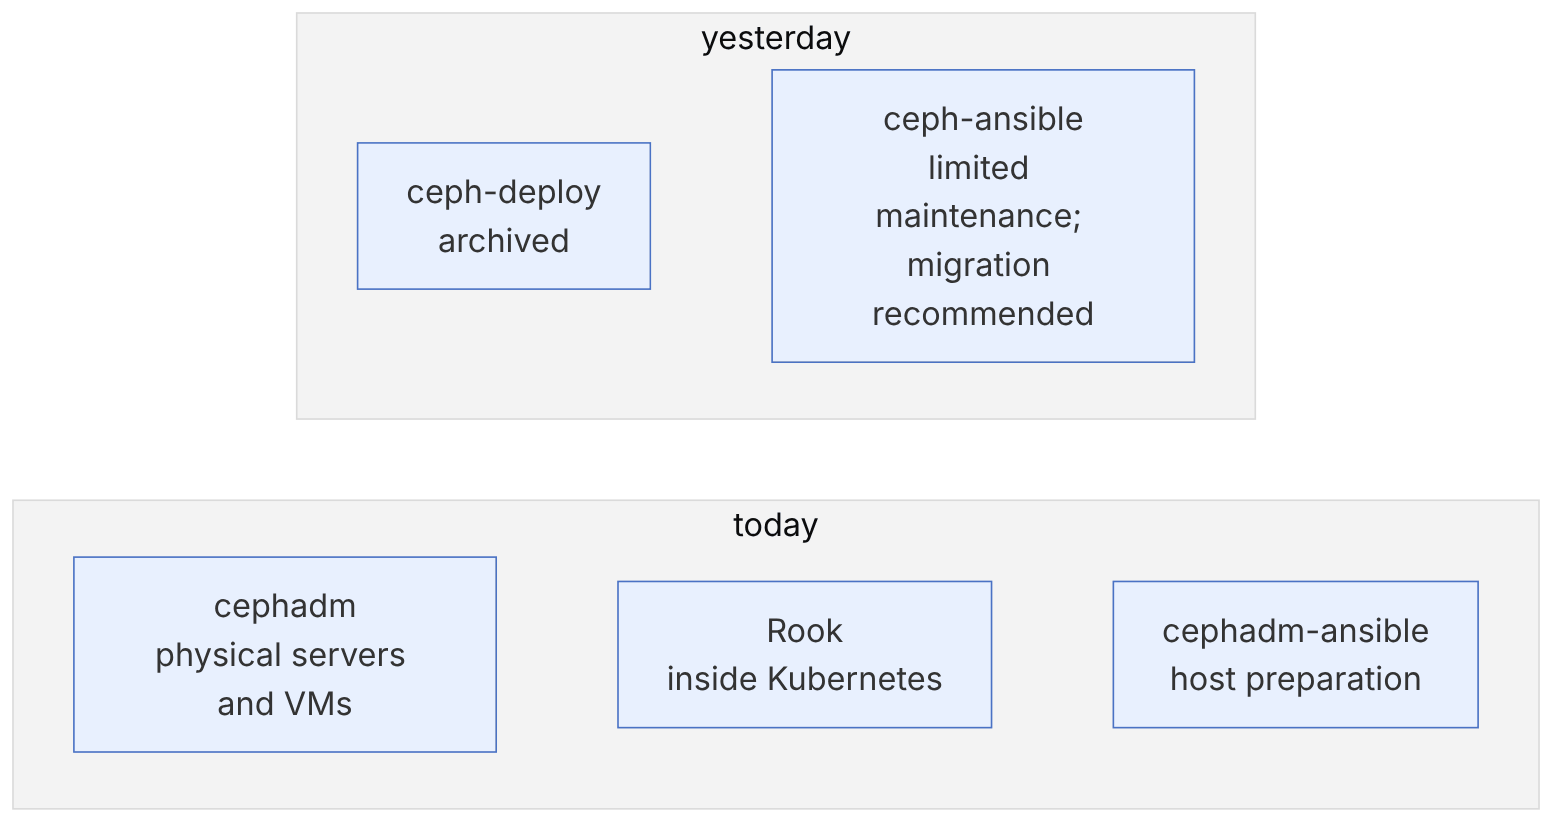
Until a few years ago deployment was usually done with three tools: Vagrant and VirtualBox for the lab, ceph-deploy for manual installation and ceph-ansible for automation. All three layers have changed since then: the ceph-deploy repository is archived, ceph-ansible's own README says the project is maintained "for now" but recommends migrating to cephadm, and the official deployment tools are cephadm (on servers and VMs) and Rook (inside Kubernetes). This chapter pursues the same goals with today's tools:
- How do we build a reproducible Ceph lab?
- How have deployment tools evolved, and which should we choose today?
- How does declarative deployment with cephadm specs work?
- What role does Ansible play today?
- When is Rook the right choice?
- How do we organise change and configuration management with GitOps?
11-2 A reproducible lab#
11-2-1 Why a lab?#
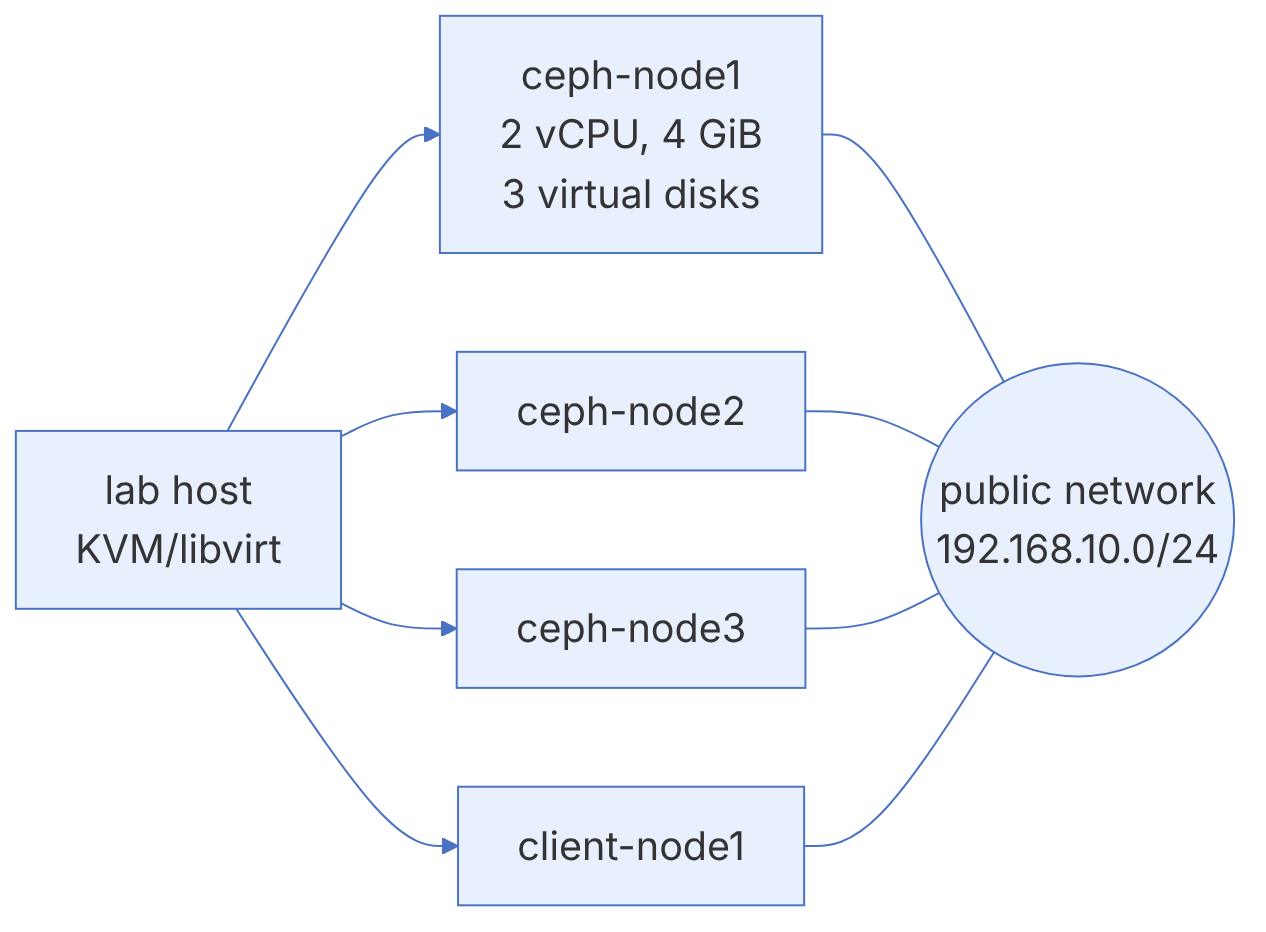
No important change (upgrade, CRUSH change, disk replacement, failure test) should be tried for the first time on a real cluster. The lab should be cheap, fast and rebuildable: if you break it, rebuild it in a few minutes.
11-2-2 Resources#
| Role | vCPU | Memory | Disk |
|---|---|---|---|
| Each Ceph node (3) | 2 to 4 | 4 to 8 GB | One 20 GB OS disk and 2 to 3 disks of 20 GB for OSDs |
| Client | 1 to 2 | 2 GB | 20 GB |
The numbers above are enough for learning, not for performance measurement. With 4 GB of memory, cephadm's autotune lowers the OSDs' memory; if the OSDs keep restarting (OOM), give the node more memory or lower osd_memory_target by hand.
11-2-3 The VM tool#
Vagrant is still a useful tool for defining VMs as code, but VirtualBox on Linux is not the first choice for this: KVM and libvirt are faster and work with Vagrant (the vagrant-libvirt plugin) or with tools such as virt-install and cloud-init. An example Vagrantfile with libvirt:
# Vagrantfile
NODES = 3
Vagrant.configure("2") do |config|
  config.vm.box = "generic/rocky9"
  (1..NODES).each do |i|
    config.vm.define "ceph-node#{i}" do |n|
      n.vm.hostname = "ceph-node#{i}"
      n.vm.network :private_network, ip: "192.168.10.1#{i}"
      n.vm.provider :libvirt do |lv|
        lv.cpus = 2
        lv.memory = 6144
        3.times { |d| lv.storage :file, size: "20G" }
      end
    end
  end
  config.vm.define "client-node1" do |c|
    c.vm.hostname = "client-node1"
    c.vm.network :private_network, ip: "192.168.10.21"
  end
endvagrant up --provider=libvirt
vagrant ssh ceph-node1 -c "lsblk"
vagrant destroy -f # wipe the lab completelyIf you are testing Umbrella, note that its images require a CPU at the x86-64-v3 level. In libvirt, set the CPU model to host-passthrough; generic and older CPU models may not advertise this level, and the containers will not run. Umbrella is also based on el10, and cephadm needs Python 3.9 or newer on the host.
11-2-4 A single-node cluster#
For quickly testing the interfaces (not failures), cephadm has a single-host mode. The --single-host-defaults option applies settings that make sense on one host, for example an OSD failure domain instead of host:
cephadm bootstrap --mon-ip 192.168.10.11 --single-host-defaults
ceph orch apply osd --all-available-devices
ceph -sA single-node cluster has no protection against host failure, and its failure behaviour differs from a real cluster. To practise disk replacement, host maintenance and upgrades, use three nodes.
11-3 The evolution of deployment tools#
| Tool | Status | Use today |
|---|---|---|
| ceph-deploy | Repository archived; does not work with recent releases | Only for understanding old sources |
| ceph-ansible | Maintained for now; official recommendation is to migrate to cephadm | Old clusters that have not migrated yet |
| cephadm | The official tool for deployment and life cycle on hosts | The default choice for servers and VMs |
| cephadm-ansible | Helper playbooks for preparing hosts and surrounding tasks | Combined with cephadm in organisations that use Ansible |
| Rook | The official Ceph operator for Kubernetes (a CNCF project) | When Ceph serves Kubernetes |
The philosophical difference between ceph-ansible and cephadm matters. ceph-ansible is imperative: each time you run the playbook, it runs the steps from the start, and the state is corrected only at the moment of the run. cephadm is declarative and continuous: the desired state is stored inside the cluster itself (in the MGR), and the orchestrator constantly compares the actual state with it and fixes any difference. If a daemon is removed, cephadm brings it back without your intervention. This is the same model Kubernetes and Rook have.
11-4 Declarative deployment with cephadm#
11-4-1 The reconciliation loop#

In chapter 1 we built the cluster command by command. In a real environment it is better to describe the whole cluster in a spec file and apply it at bootstrap or afterwards. The advantages: reproducibility, review in Git, and the ability to quickly rebuild a lab with the same configuration as production.
11-4-2 A complete spec file#
# cluster.yaml
service_type: host
hostname: ceph-node1
addr: 192.168.10.11
labels: [_admin, mon, mgr, osd]
location: {root: default, rack: rack1}
---
service_type: host
hostname: ceph-node2
addr: 192.168.10.12
labels: [mon, mgr, osd, rgw]
location: {root: default, rack: rack2}
---
service_type: host
hostname: ceph-node3
addr: 192.168.10.13
labels: [mon, osd, mds, rgw]
location: {root: default, rack: rack3}
---
service_type: mon
placement:
  label: mon
---
service_type: mgr
placement:
  label: mgr
---
service_type: osd
service_id: hdd-with-ssd-db
placement:
  label: osd
spec:
  data_devices:
    rotational: 1
  db_devices:
    rotational: 0
  encrypted: true
---
service_type: rgw
service_id: objstore
placement:
  label: rgw
  count_per_host: 1
spec:
  rgw_frontend_port: 8080
---
service_type: mds
service_id: fs01
placement:
label: mds# on the first node, after copying cephadm's public SSH key to the other nodes
cephadm bootstrap --mon-ip 192.168.10.11 --cluster-network 192.168.20.0/24 --apply-spec cluster.yaml
# or on an existing cluster
ceph orch apply -i cluster.yaml --dry-run
ceph orch apply -i cluster.yamlAlways run --dry-run before applying. Its output shows which OSDs will be created on which disks. A common mistake: the rotational: 0 filter in virtual environments, because virtual disks may present themselves as rotational or non-rotational regardless of the real hardware. In such cases use the size, model or paths filters.
11-4-3 Device filters#
| Filter | Example | Use |
|---|---|---|
| rotational | rotational: 1 | Separating HDD and SSD |
| size | size: '10T:' | Disks larger than 10 TB |
| model / vendor | model: 'MZ7L3' | A specific model |
| paths | paths: [/dev/sdb, /dev/sdc] | Explicit paths (for heterogeneous hosts) |
| limit | limit: 2 | At most this many disks of this type |
Broad filters such as all: true or --all-available-devices turn every new empty disk into an OSD, including a disk you added to the host for something else. In production, define the OSD spec with specific filters, and if necessary set unmanaged: true temporarily to stop automatic OSD creation.
11-4-4 Maintaining the spec#
ceph orch ls --export > cluster-current.yaml
diff -u cluster.yaml cluster-current.yaml
ceph orch ls osd --export
ceph orch rm rgw.objstore # remove a service (its daemons are removed too)11-5 Ansible alongside cephadm#
11-5-1 Division of labour#
cephadm needs hosts that meet the prerequisites: a container engine (podman or docker), lvm2, time synchronisation, a suitable Python and the cluster SSH key. These tasks are repetitive, and Ansible is a good tool for them. The cephadm-ansible project has ready playbooks for exactly these surrounding tasks (host preparation, distributing configuration files and keys, cleanup). The suggested division of labour:
- Ansible: OS, packages, network and MTU, chrony, users, firewall, SSH key, kernel settings.
- cephadm: everything inside Ceph; daemons, specs, upgrades.
11-5-2 A simple preparation playbook#
# inventory.ini
[ceph]
ceph-node1 ansible_host=192.168.10.11
ceph-node2 ansible_host=192.168.10.12
ceph-node3 ansible_host=192.168.10.13

[ceph:vars]
ansible_user=root# prepare-hosts.yml
- hosts: ceph
become: true
tasks:
- name: Required packages
ansible.builtin.package:
name: [podman, lvm2, chrony, python3]
state: present
- name: Time sync running
ansible.builtin.service:
name: chronyd
state: started
enabled: true
- name: Cluster SSH public key for cephadm
ansible.posix.authorized_key:
user: root
key: "{{ lookup('file', 'files/ceph.pub') }}"
- name: Jumbo frames on storage NIC
community.general.nmcli:
conn_name: storage
mtu: 9000
state: presentansible -i inventory.ini ceph -m ping
ansible-playbook -i inventory.ini prepare-hosts.yml --check --diff
ansible-playbook -i inventory.ini prepare-hosts.ymlThe exact name of the network interface and NetworkManager connection differs in each environment; the MTU snippet above is only a template. Take the ceph.pub file from /etc/ceph/ceph.pub on the bootstrap node; it is only the public key and putting it in the Ansible repository is fine, but the cluster's private SSH key must never go into the repository.
11-5-3 Migrating from ceph-ansible#
If you have a cluster built with ceph-ansible, there is a documented adopt path: cephadm "takes over" the existing daemons one by one and converts them into containers it manages. ceph-ansible also has a playbook for this (cephadm-adopt).
cephadm ls                                   # existing daemons and their deployment type (legacy or cephadm)
cephadm adopt --style legacy --name mon.ceph-node1Practise the migration first in a lab with the same release and deployment method. Before starting, the cluster must be healthy, and after the MONs and MGRs have been adopted, the cephadm module must be enabled and the SSH key distributed so that the remaining daemons can be managed through the orchestrator.
11-6 From lab to production#
11-6-1 Pre-deployment checklist#
Before bootstrapping a real cluster, confirm these items one by one and document the results. Most problems in a cluster's first months come back to this list:
| Area | Check | Tool or command |
|---|---|---|
| Hardware | All nodes of a role have identical hardware and firmware | lshw, nvme list, vendor tool |
| Disk | DB/WAL or OSD SSDs have power-loss protection; the controller write cache is set appropriately | fio with sync (chapter 10) |
| Network | End-to-end MTU, bandwidth of each link, bond and switch redundancy | iperf3, ping -M do |
| Time | All nodes are synchronised with chrony | chronyc tracking |
| DNS | Short host names match hostname and resolve | hostname, getent hosts |
| OS | Distribution and kernel on the supported list for the Ceph release; SELinux/AppArmor per the documentation | cat /etc/os-release |
| Firewall | MON ports (3300 and 6789), OSD/MGR/MDS (6800 to 7300) and service ports are open | firewall-cmd --list-all |
| Backup | Admin keys and spec files in a secure repository outside the cluster | — |
Host names have a subtle point: by default cephadm expects the name you give in ceph orch host add to match the output of hostname on that host. Mixing short names on one node and FQDNs on another causes trouble later in upgrades and host checks. Choose one convention and follow it everywhere.
11-6-2 An isolated (offline) environment#
Many storage clusters have no internet access. For this case cephadm supports a local registry: you put all the images (Ceph, Prometheus, Grafana, Alertmanager, node-exporter, ...) in an internal registry and point cephadm at it.
# on a machine with internet access: pull the image and push it to the internal registry
podman pull quay.io/ceph/ceph:v20.2.5
podman tag quay.io/ceph/ceph:v20.2.5 registry.internal:5000/ceph/ceph:v20.2.5
podman push registry.internal:5000/ceph/ceph:v20.2.5
# bootstrap with the internal image
cephadm --image registry.internal:5000/ceph/ceph:v20.2.5 bootstrap --mon-ip 192.168.10.11 \
  --registry-json /root/registry.json
# point the monitoring images at the internal registry
ceph config set mgr mgr/cephadm/container_image_prometheus registry.internal:5000/prometheus/prometheus:<tag>
ceph config set mgr mgr/cephadm/container_image_grafana registry.internal:5000/ceph/grafana:<tag>The registry.json file contains the registry user name and password; set its permissions to 600 and delete it after bootstrap (cephadm keeps the credentials inside the cluster). Take the exact tags of the monitoring images from your release's documentation or from the output of ceph config get mgr mgr/cephadm/container_image_prometheus on a test cluster of the same release, not from a guess.
11-6-3 After bootstrap#
ceph -s
ceph orch host ls
ceph orch device ls --wide
ceph cephadm check-host ceph-node2
ceph health mute CEPHADM_STRAY_DAEMON 1h   # only if you know the cause and it is temporary
ceph orch ls --export > /srv/ceph-gitops/specs/cluster.yamlCommit the first output of ceph orch ls --export to Git immediately. This is the "baseline", and all later changes should be reviewed through it.
11-7 Inside the code: the cephadm serve loop and the OSD spec#
11-7-1 A declarative orchestrator#
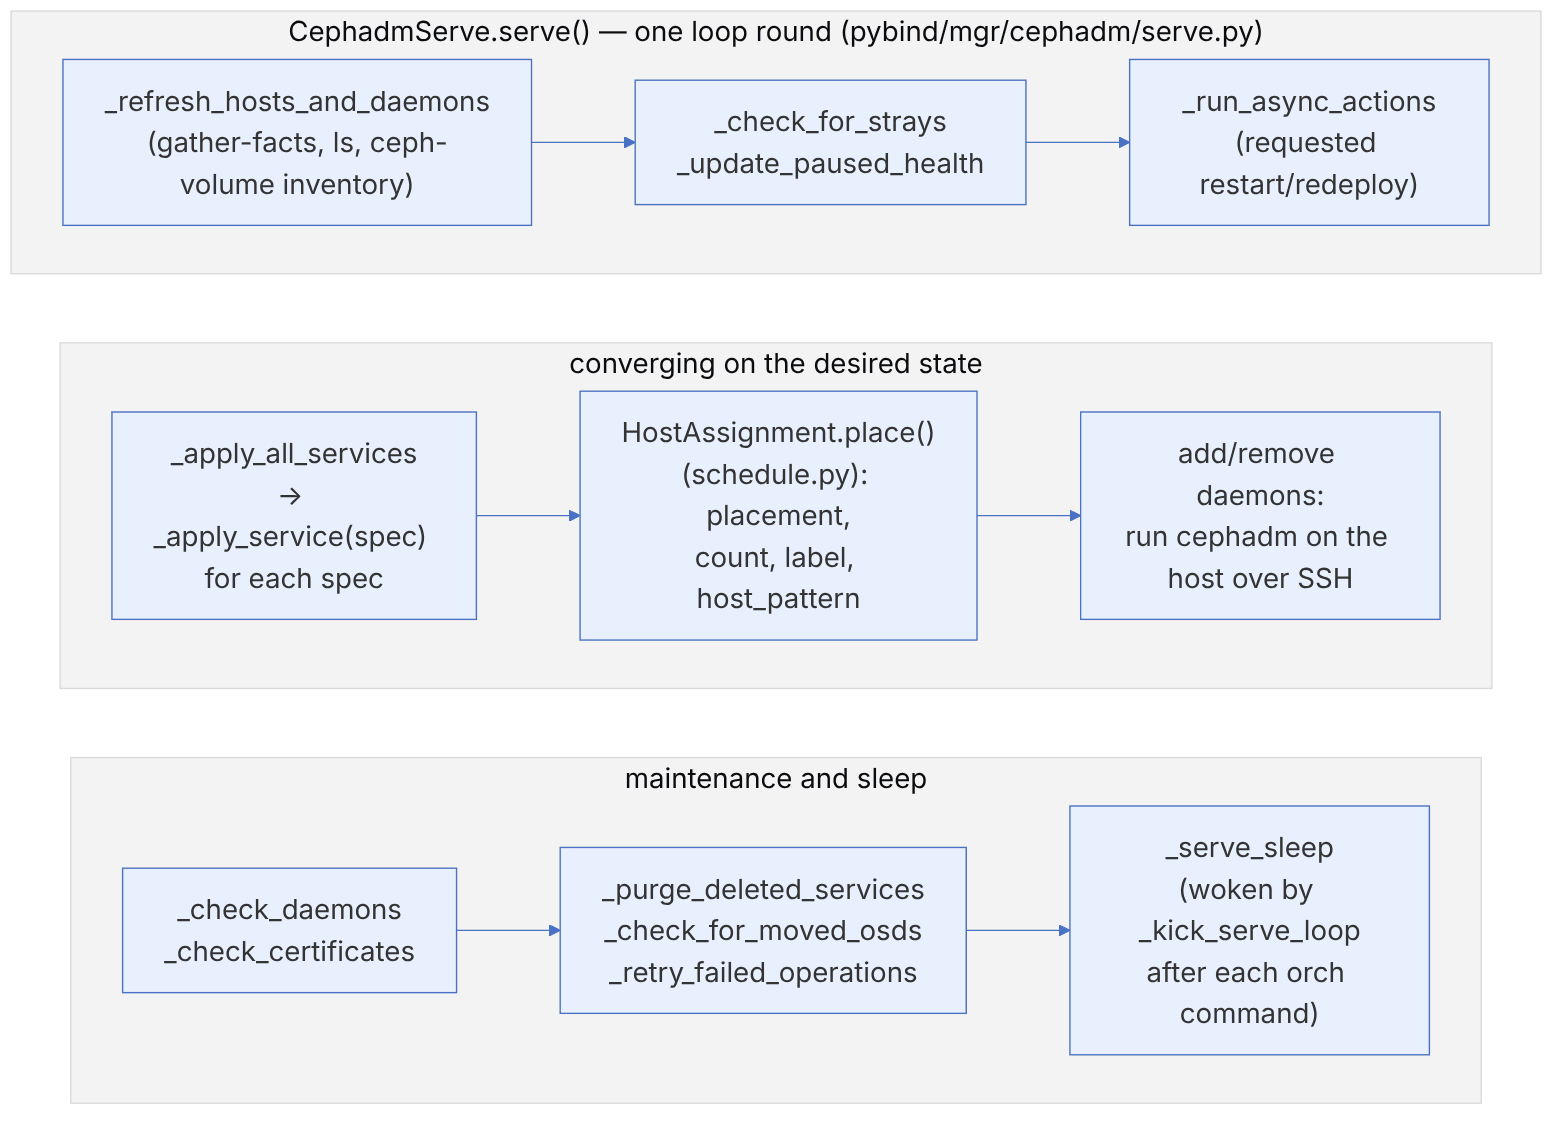
cephadm is an mgr module (src/pybind/mgr/cephadm/). Its heart is the CephadmServe class in serve.py, which runs a convergence (reconcile) loop and is therefore similar in idea to Kubernetes controllers. The desired state is the specs stored with ceph orch apply. The actual state is a cache of host information collected by running the cephadm binary on each host over SSH.
| Module option (module.py) | Default | Role |
|---|---|---|
| device_cache_timeout | 1800 seconds | Refresh the device inventory |
| daemon_cache_timeout | 600 seconds | Refresh the daemon list |
| facts_cache_timeout | 600 seconds | Refresh gather-facts |
| host_check_interval | 600 seconds | Check SSH access and host health |
| max_count_per_host | 10 | Cap on daemons of one type on one host |
This is why a newly installed disk may not appear in ceph orch device ls for up to 30 minutes. For an immediate refresh, use ceph orch device ls --refresh.
11-7-2 The OSD spec and DriveSelection#
The OSD spec is the DriveGroupSpec class in src/python-common/ceph/deployment/drive_group.py, which inherits from ServiceSpec. The device filters (DeviceSelection: rotational, size, model, vendor, paths, limit, all) are defined for the three roles data, db and wal, and DriveSelection in drive_selection/selector.py applies them to each host's inventory. Features such as encrypted, tpm2, osds_per_device, block_wal_size and osd_id_claims are listed in this class's _supported_features.
# osd-hybrid.yaml — this book's example: HDD for data, shared NVMe for DB
service_type: osd
service_id: hybrid-hdd-nvme
placement:
  label: osd
spec:
  data_devices:
    rotational: 1
    size: '8T:'
  db_devices:
    rotational: 0
    model: 'MZ'          # NVMe model prefix
    limit: 2
  encrypted: true
objectstore: bluestorepseudocode: applying an OSD spec (this book's summary of serve.py and services/osd.py)
for host in HostAssignment(spec).place():
devs = DriveSelection(spec, inventory[host]) # filtered data/db/wal
cmds = translate to ceph-volume lvm batch ... # excluding devices in use
out = run cephadm ceph-volume --report (dry-run), then the real run
deploy osd daemons for new osd idsThe OSD spec is "persistent": after apply, any empty disk matching the filter that is later added to the host becomes an OSD automatically. If you do not want this, set unmanaged: true. Always run --dry-run first.
Commands:
ceph orch apply -i osd-hybrid.yaml --dry-run
ceph orch ls osd --export
ceph orch device ls --refresh --wide
ceph log last cephadm 50                 # events of the serve loop
ceph config set mgr mgr/cephadm/log_to_cluster_level debug
ceph mgr fail # failover; the loop starts afresh on the new mgr11-8 Deployment by the numbers: four cephadm and ceph-volume algorithms#
On the surface cephadm just takes a "spec" and creates daemons. In practice, several small algorithms decide which host each daemon goes to, how a fast disk is divided between OSDs, and how many OSDs are stopped at once during an upgrade. This section follows four algorithms from the main code (checked in November 2026) with numerical examples. The output of every example was obtained by running the same logic in Python. The details of these functions have changed between releases (for example the "related service" logic for ingress is newer), so read your release's code before relying on the details.
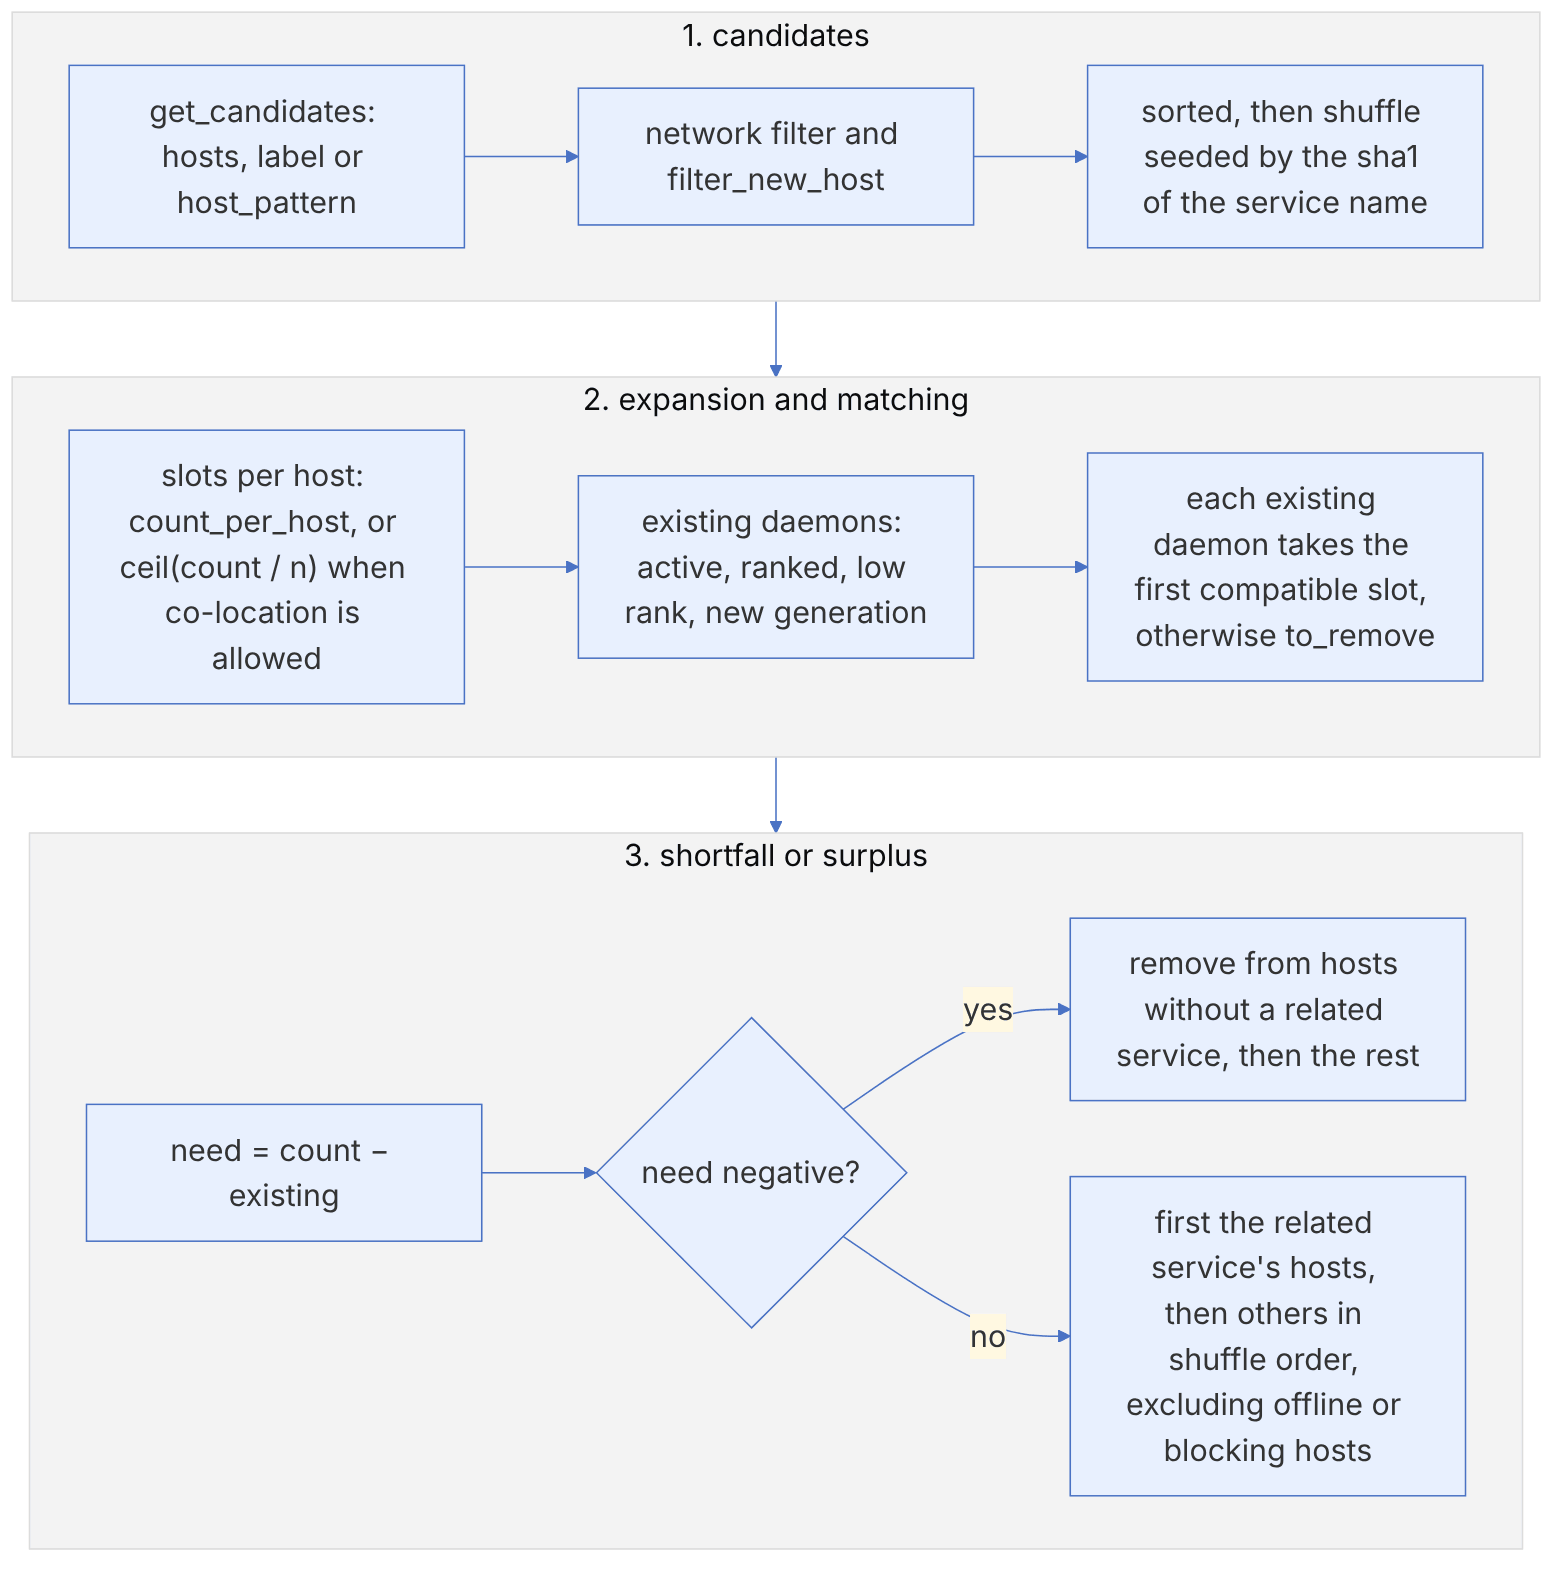
11-8-1 Choosing hosts: HostAssignment#
Source in code: src/pybind/mgr/cephadm/schedule.py :: HostAssignment.place, get_candidates
Complexity: O(H log H) for sorting and shuffling; O(D × H) for matching D existing daemons to H slots
pseudocode
candidates = hosts matching hosts or label or host_pattern in the placement
candidates = network filter (networks or ip_addrs) and filter_new_host
seed = int(sha1(service_name), 16) mod 2^32
candidates = shuffle(sorted(candidates), Random(seed))     # deterministic for each service name
slots = count_per_host slots per host  or  ceil(count / |candidates|) if co-location is allowed
daemons = sorted by (active first, ranked first, lower rank, newer generation)
for d in daemons: if a slot is compatible with d ⇒ existing , otherwise to_remove
need = count − |existing|
if need < 0: remove from the end of existing (first from hosts without a related service)
else: first hosts with a related service, then others in the same shuffle order, excluding offline or blocking hosts
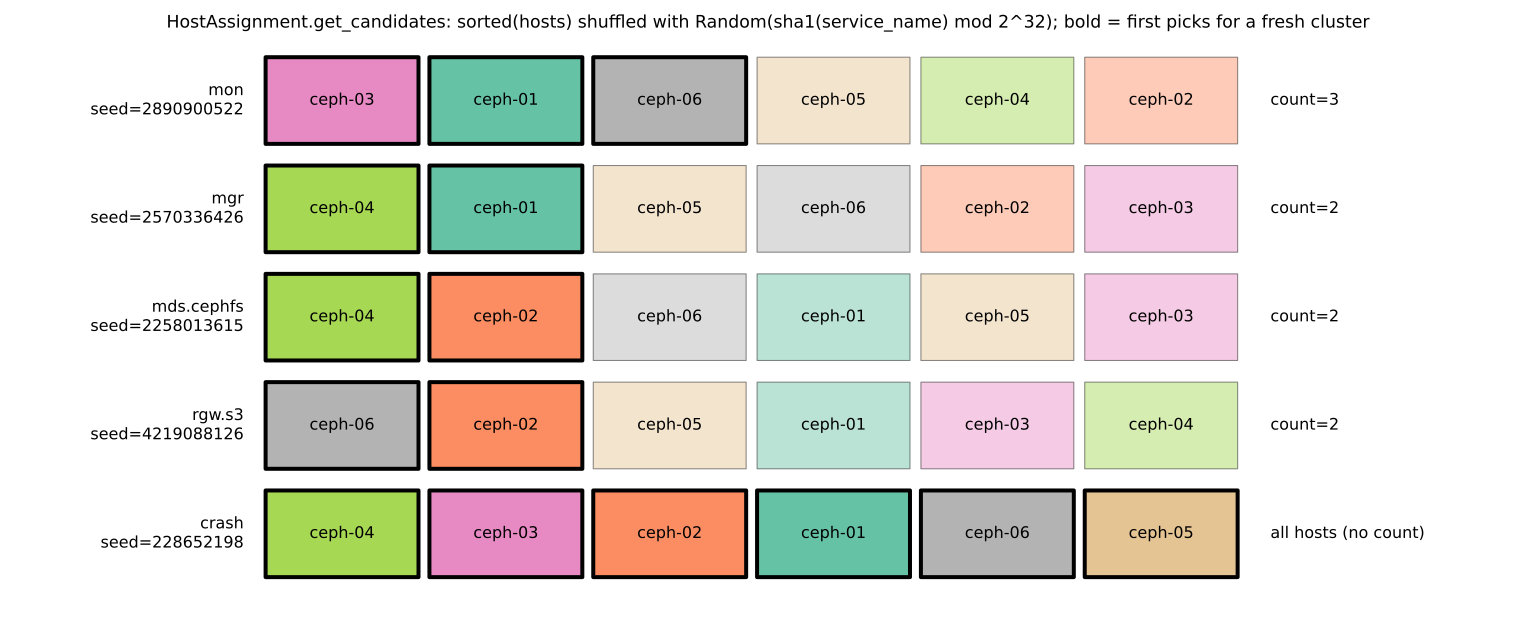
Numerical example. We have a new cluster with six hosts, ceph-01 to ceph-06, and no existing daemons. For the mon service, the sha1 gives seed = 2890900522 and the shuffle order is: ceph-03, ceph-01, ceph-06, ceph-05, ceph-04, ceph-02. With count: 3, the three monitors go to ceph-03, ceph-01 and ceph-06. The mgr service, with seed = 2570336426, has a different order: ceph-04, ceph-01, ceph-05 and the rest. So with count: 2 the two mgrs land on ceph-04 and ceph-01.
Two properties matter. First, it is deterministic: if the active mgr changes or cephadm runs again, the same result comes out and daemons do not move for no reason. Second, it is different for each service: the services do not all pile up on the first host. If ceph-03 is later removed, the monitor on it goes to to_remove. The next free host in the shuffle order (ceph-05) takes its place, and the other two monitors are untouched.
11-8-2 Dividing NVMe between OSDs: ceph-volume batch#
Source in code: src/ceph-volume/ceph_volume/devices/lvm/batch.py :: Batch.fast_allocations, get_physical_fast_allocs
Complexity: O(F × S) for F fast devices and S slots
pseudocode
fast_slots_per_device = ceil((requested OSDs − ready fast LVs) / max(1, physical fast devices))
requested_slots = db_slots from the spec  (if smaller, ignored and set to fast_slots_per_device)
requested_size  = block_db_size from the spec or ceph.conf (default 0 means automatic)
for each fast device:
    abs_size = vg_size / slots_for_vg
    if abs_size > vg_free: abs_size = vg_free / fast_slots_per_device      # half-full VG
    if requested_size ≤ abs_size: abs_size = requested_size
    if requested_size is up to 1% larger: keep abs_size (PE alignment error)
    otherwise: error and exit
    while there is room and OSDs are short and the slots are not full: create an LV of abs_size
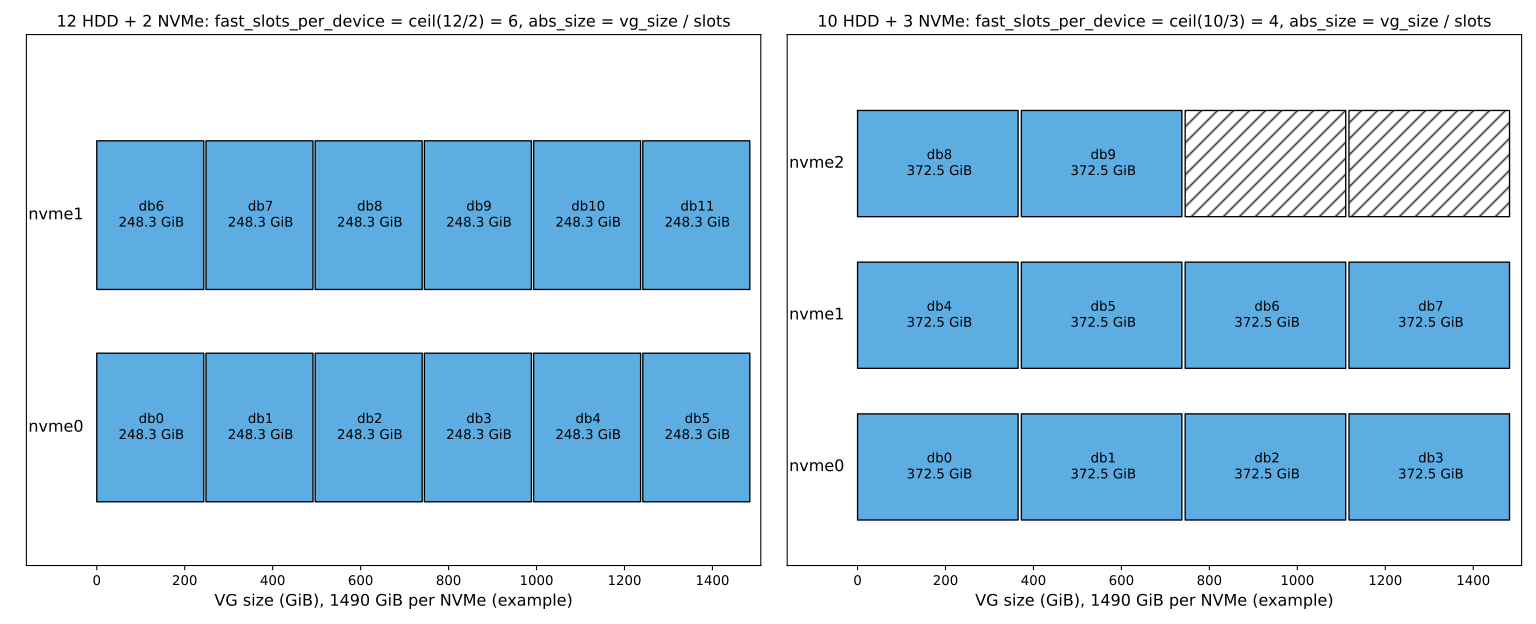
Numerical example. A host has 12 HDDs and 2 NVMes. Suppose each NVMe's VG is about 1490 GiB after LVM alignment (an example number, not a measurement). fast_slots_per_device = ⌈12 / 2⌉ = 6, so each DB is 1490 / 6 ≈ 248.3 GiB and each NVMe gets exactly six DBs. Now consider 10 HDDs and 3 NVMes. fast_slots_per_device = ⌈10 / 3⌉ = 4 and each DB is 1490 / 4 = 372.5 GiB. The first and second NVMe each get four DBs and the third NVMe only two, because the len(ret) < new_osds condition stops after ten DBs. Half of the third NVMe stays empty. If you want a balanced division (for example three NVMes with 4, 3 and 3 DBs), you must give db_slots or block_db_size explicitly, or make the number of HDDs a multiple of the number of NVMes. DB size is not the only important factor. With the number above and the RocksDB placement we saw in chapter 16, 248 GiB gives enough room for the fast levels.
11-8-3 Staged upgrades: the daemon order#
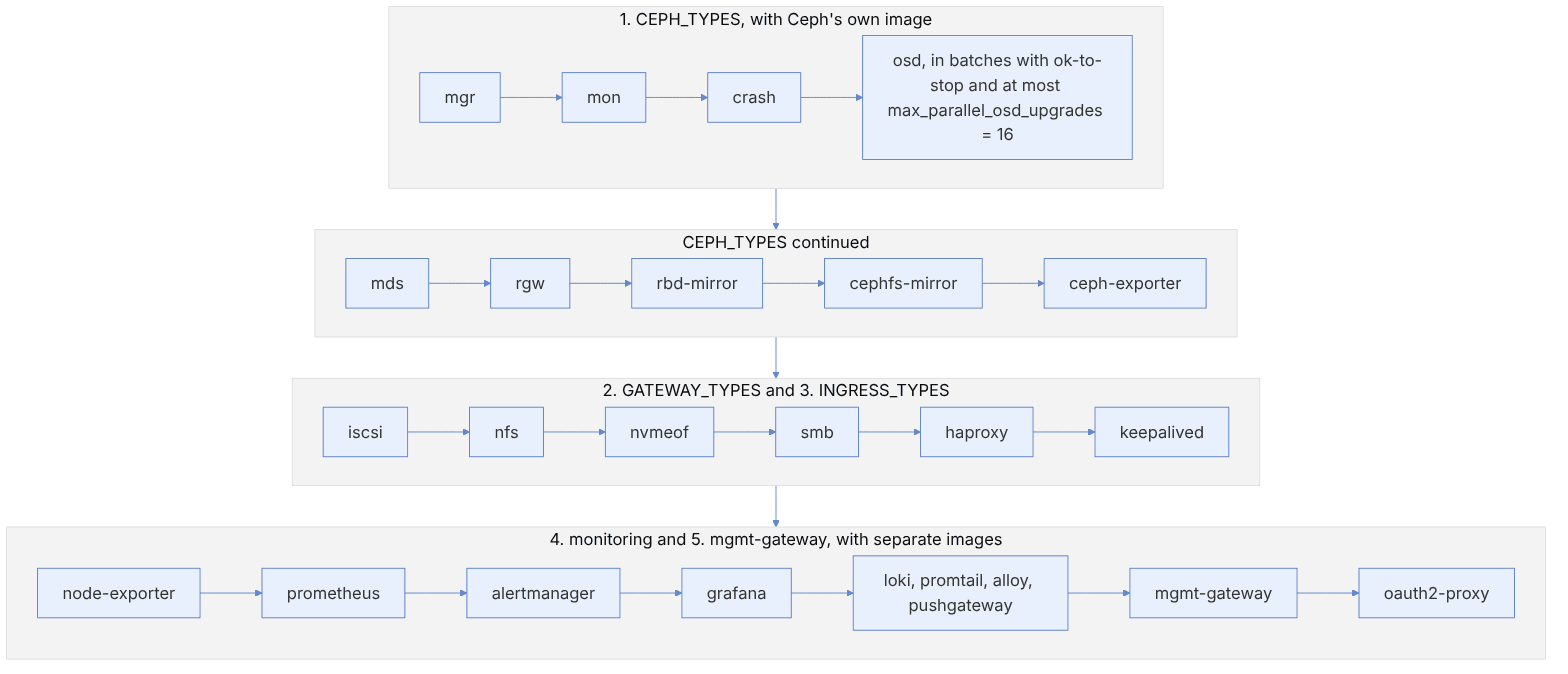
Source in code: src/pybind/mgr/cephadm/utils.py :: CEPH_UPGRADE_ORDER; src/pybind/mgr/cephadm/upgrade.py :: CephadmUpgrade._do_upgrade, _to_upgrade
Complexity: O(T × D) for T daemon types and D daemons; one ok-to-stop check per OSD
pseudocode
ORDER = [mgr, mon, crash, osd, mds, rgw, rbd-mirror, cephfs-mirror, ceph-exporter]   # CEPH_TYPES
      + [iscsi, nfs, nvmeof, smb] + [haproxy, keepalived]
      + [node-exporter, prometheus, alertmanager, grafana, loki, promtail, alloy, pushgateway]
      + [mgmt-gateway, oauth2-proxy]
for type in ORDER (or the --daemon-types / --services subset):
    for d in daemons of that type with the old image:
        mon: ask ok-to-stop only if the monmap has more than 2 monitors
        osd: a batch with "osd ok-to-stop … --max max_parallel_osd_upgrades (16)"
        mgr: the standby mgr is upgraded first, then failover
        redeploy with the new image ; wait until the daemon comes up
Numerical example. We have a cluster with 3 mons, 2 mgrs, 36 OSDs (three hosts, twelve OSDs per host, replicated size 3 and failure domain = host) and 2 RGWs. The order: the standby mgr and failover, then the other mgr. Then the three mons one by one. Then the OSDs in batches of at most 16. Because the ok-to-stop algorithm (next section) keeps each batch within one host, each batch is 12 OSDs and three batches are needed. Finally the RGWs. At any moment at most one OSD host is stopped and no PG goes below min_size.
11-8-4 How many OSDs can be stopped at once?#
Source in code: src/mgr/DaemonServer.cc :: DaemonServer::_maximize_ok_to_stop_set, _check_offlines_pgs
Complexity: each test O(P × r) for P PGs with r members; at most O(N) tests for N OSDs
pseudocode
check(S): for each PG with a member in S:
    acting' = acting − S   (if degraded: only members without missing objects)
    if the PG is not active or has no pool or |acting'| < min_size ⇒ not_ok
maximize(S0, max):
    if check(S0) unsafe ⇒ stop ; if |S0| ≥ max ⇒ stop
    parent = the first OSD in S0
    loop:
        parent = the immediate parent of parent in CRUSH (host, then rack, … , root)
        for each up OSD under parent in id order:
            S += o ; if check(S) unsafe ⇒ S −= o , failed++
            if |S| == max ⇒ stop
        if failed > 0 ⇒ stop (with what has been safe so far)
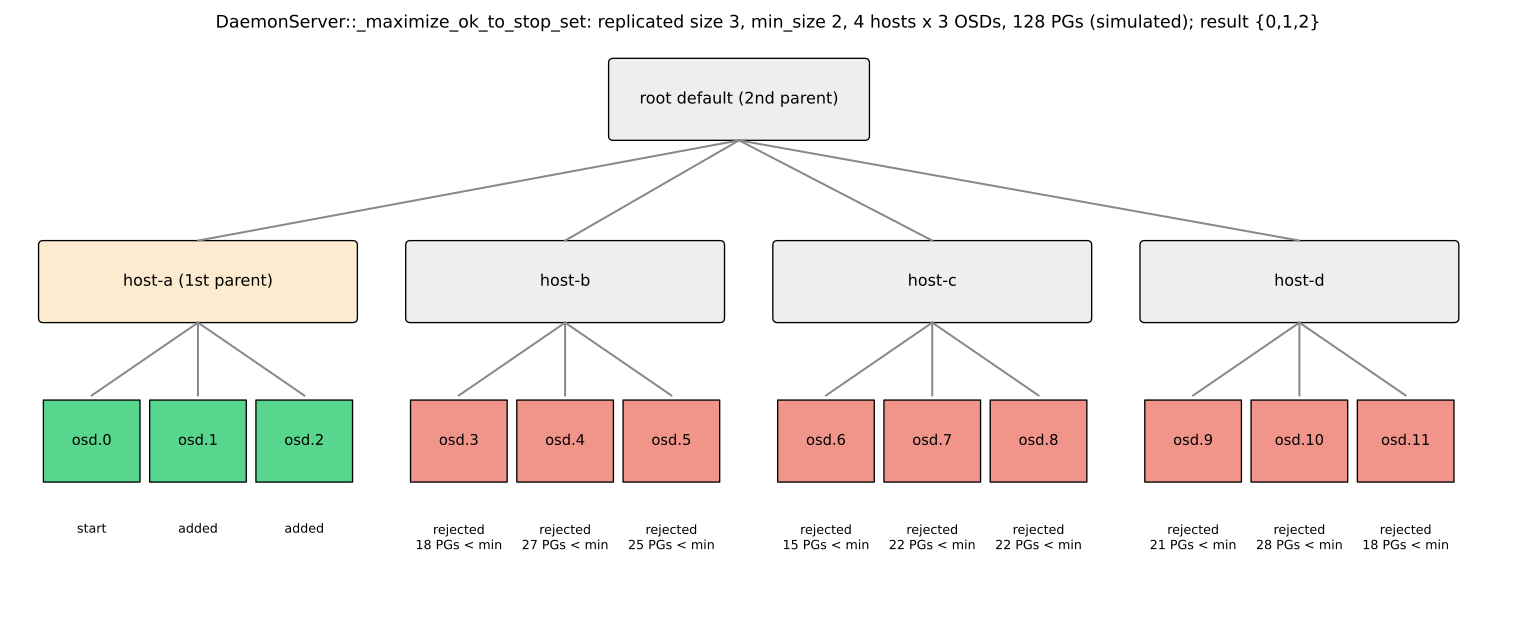
Numerical example. Our simulation has 4 hosts with 3 OSDs each, and 128 PGs with size = 3 and min_size = 2, each PG on three different hosts. We start from osd.0. The first parent is host-a: osd.1 and osd.2 are added, because no PG has two members on one host and every PG keeps two members after losing one host. The next parent is root. Adding osd.3 on host-b leaves eighteen PGs with one member, so it is rejected. All the other OSDs are rejected too, with 15 to 28 unsafe PGs. Because failed > 0, the result is {0, 1, 2}, i.e. exactly one host. For an EC 4+2 pool on six hosts (two OSDs per host), with the default min_size k + 1 = 5 only the OSDs of one host are allowed. If we lower min_size to k = 4, two hosts become allowed, but then any further failure makes the PG inactive and new data is written with no redundancy at all.
This algorithm is greedy, not optimal. A larger set starting from another OSD may exist, but the algorithm does not find it. The traversal order is by numeric OSD id, not by the tree structure. A practical point: if a cluster has degraded PGs, check counts only members "without missing objects". So in a half-healthy cluster, the upgrade may stop only one OSD at a time or not progress at all. The message upgrade: waiting for ok-to-stop in ceph orch upgrade status is usually this, and the fix is to reach HEALTH_OK before upgrading, not to raise max_parallel_osd_upgrades.
11-9 Ceph inside Kubernetes with Rook#
11-9-1 Architecture#
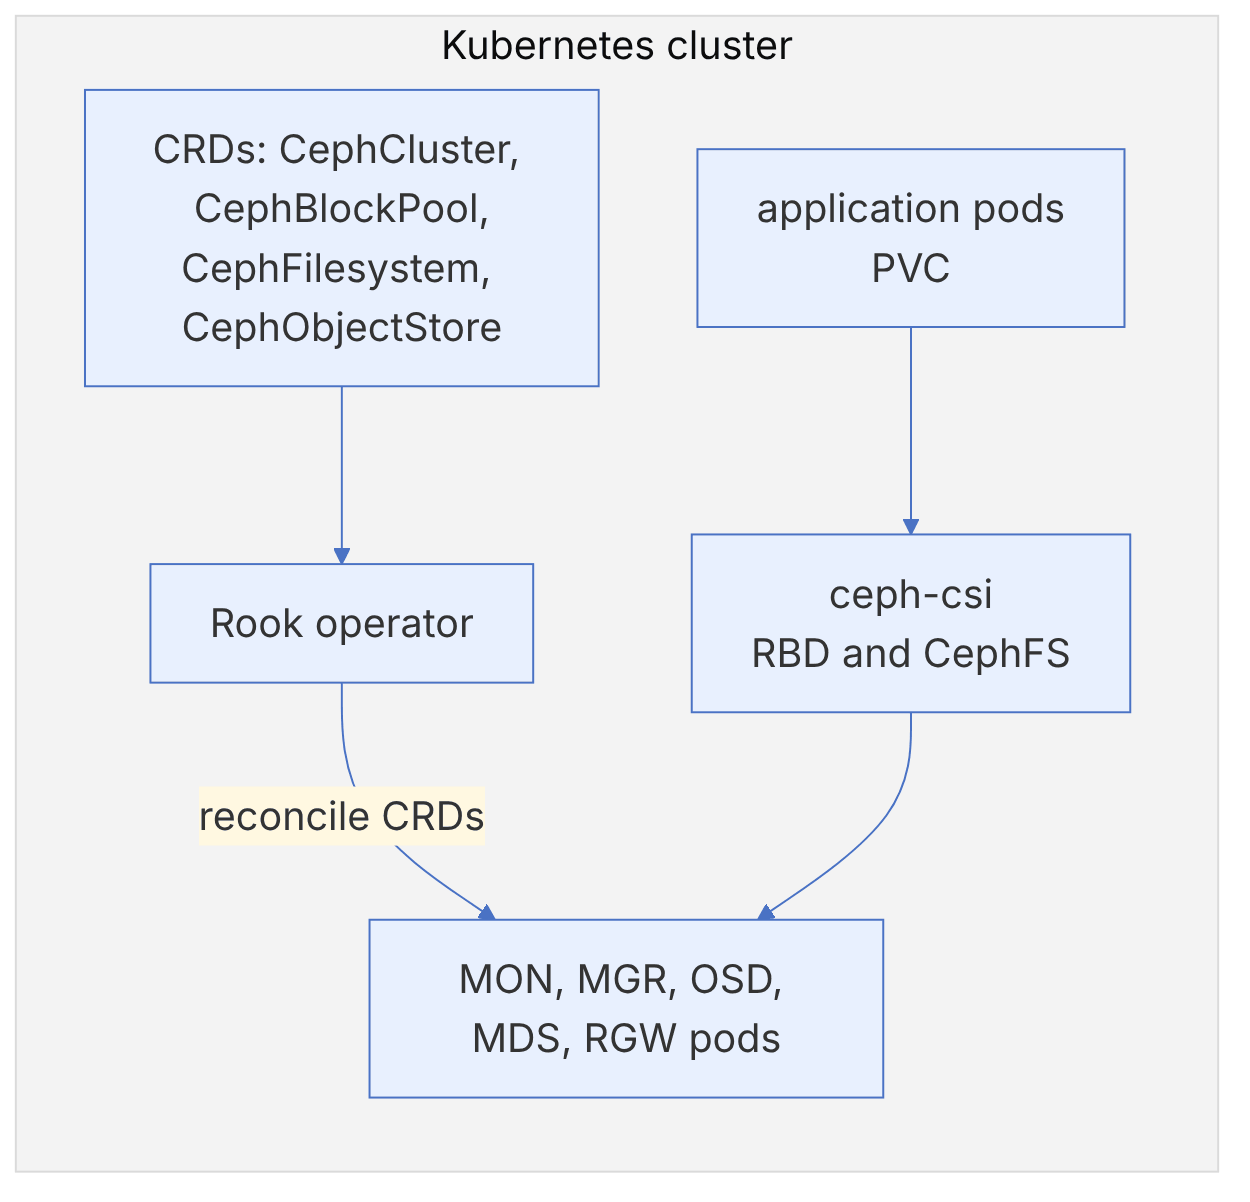
Rook is a Kubernetes operator that builds and maintains a Ceph cluster from custom resources (CRDs). It is the same declarative idea as cephadm, this time with Kubernetes-native tools: kubectl apply, Helm and GitOps. The ceph-csi driver provides RBD (ReadWriteOnce) and CephFS (ReadWriteMany) PVCs for pods.
11-9-2 When Rook?#
| Criterion | cephadm | Rook |
|---|---|---|
| Main consumer | VMs, OpenStack, general services | Kubernetes workloads |
| Dependency | Only the OS and a container engine | A healthy, stable Kubernetes cluster |
| Failure domain | Independent of the layer above | Kubernetes failures affect Ceph management |
| Team experience | System and storage administrators | Kubernetes platform team |
Running Ceph inside the same Kubernetes cluster that runs the applications (hyperconverged) creates a circular dependency: if Kubernetes runs into trouble, storage is disrupted too, and vice versa. For large clusters, separate the storage nodes with taints and labels, or deploy Ceph outside Kubernetes with cephadm and use Rook in external cluster mode only for the connection.
11-9-3 Basic installation#
helm repo add rook-release https://charts.rook.io/release
helm install --create-namespace --namespace rook-ceph rook-ceph rook-release/rook-ceph
kubectl -n rook-ceph get pods# cluster.yaml (abridged)
apiVersion: ceph.rook.io/v1
kind: CephCluster
metadata:
name: rook-ceph
namespace: rook-ceph
spec:
cephVersion:
image: quay.io/ceph/ceph:v20.2.4
dataDirHostPath: /var/lib/rook
mon:
count: 3
allowMultiplePerNode: false
dashboard:
enabled: true
storage:
useAllNodes: false
useAllDevices: false
nodes:
- name: k8s-storage-1
devices: [{name: sdb}, {name: sdc}]
- name: k8s-storage-2
devices: [{name: sdb}, {name: sdc}]
- name: k8s-storage-3
devices: [{name: sdb}, {name: sdc}]kubectl apply -f cluster.yaml
kubectl -n rook-ceph get cephcluster
kubectl -n rook-ceph exec deploy/rook-ceph-tools -- ceph -s # requires the toolbox deploymentThe image version above is what the official Rook documentation example uses at the time of writing. When you use it, check the table of supported Ceph versions in the documentation for your Rook release. useAllDevices: true is dangerous in production; name the disks explicitly or select them with a specific filter.
11-10 Change and configuration management#
11-10-1 GitOps for storage#

Storage is not a place where a "quick change in the console" is acceptable. The principles we suggest:
- A single source of truth: cephadm specs (or Rook CRDs) and the output of
ceph config dumpin Git. - Peer review: every change goes through a Merge Request explaining the motivation, the risk and the rollback method.
- Automatic dry-run: CI attaches the output of
ceph orch apply --dry-runto the Merge Request. - Change window: risky changes (CRUSH, tunables, EC profile, upgrades) in off-peak hours with an operator on hand.
- Post-change check:
ceph -s, alerts and latency charts for at least an hour. - Drift detection: a scheduled job that compares
ceph orch ls --exportandceph config dumpwith Git and reports differences.
#!/usr/bin/env bash
# drift-check.sh: compare the cluster state with the repository
set -euo pipefail
cd /srv/ceph-gitops
ceph orch ls --export > /tmp/live-specs.yaml
ceph config dump --format json | jq -S 'sort_by(.section, .name)' > /tmp/live-config.json
diff -u specs/cluster.yaml /tmp/live-specs.yaml || echo "SPEC DRIFT"
diff -u config/config.json /tmp/live-config.json || echo "CONFIG DRIFT"Drift is not always bad: disk replacements or memory autotune may create changes. The goal is that every difference is either deliberately brought back into Git or fixed in the cluster, not silently accumulated.
- A rebuildable three-node lab with the same release and deployment method as production.
- cephadm for hosts, Rook for Kubernetes; put ceph-deploy aside.
- The whole cluster in a spec; always
--dry-runbefore apply. - Specific device filters; avoid
all-available-devicesin production. - Ansible for the OS, cephadm for Ceph.
- Migrate from ceph-ansible with adopt, after practising in a lab.
- Git is the source of truth; monitor drift.
11-11 Supplementary and up to date#
- ceph-deploy: the repository is archived on GitHub.
- ceph-ansible: according to the project's own README it is maintained for now, but migrating to cephadm is recommended; the
cephadm-adopt.ymlplaybook exists for this. - cephadm-ansible: helper playbooks for preparing hosts.
- Umbrella: el10 images, a requirement for an x86-64-v3 CPU, and Python 3.9 or newer for cephadm.
- Rook: version v1.21.2 at the time of writing; the official CephCluster example uses a Tentacle image.
11-12 Hands-on exercise#
- 1. Build three nodes and one client with Vagrant and libvirt (or a tool of your choice), then wipe them with
vagrant destroy, rebuild, and note the total time. - 2. Adapt this chapter's
cluster.yamlto your host names and disks and apply it at bootstrap with--apply-spec. - 3. Compare two different OSD specs (based on rotational and based on size) with
--dry-run. - 4. Run the preparation playbook with
--check --diffand then apply it for real. - 5. In a test Kubernetes cluster (for example with three VMs), install Rook and create an RBD PVC.
- 6. Run the drift-check script, then change a setting by hand and see the drift reported.
11-13 Review questions#
- 1. Why is ceph-deploy no longer a suitable option?
- 2. What is the philosophical difference between ceph-ansible and cephadm?
- 3. Why must the virtual CPU model be checked for an Umbrella lab?
- 4. What does the
--single-host-defaultsoption do, and what is the limitation of a single-node cluster? - 5. Why is
--dry-runimportant before applying an OSD spec? - 6. Why can the
rotationalfilter be misleading in a virtual environment? - 7. What is the suggested division of labour between Ansible and cephadm?
- 8. What is the migration path from ceph-ansible to cephadm?
- 9. What is the risk of running Ceph inside the same Kubernetes cluster as the applications, and how can it be reduced?
- 10. What is the benefit of drift detection?
Answers to these questions are in Appendix E: Answers to Review Questions. Answers to this chapter's questions →
11-14 Sources for this chapter#
- Deploying a new cluster (cephadm
https://docs.ceph.com/en/latest/cephadm/install/ - Host management
https://docs.ceph.com/en/latest/cephadm/host-management/ - OSD service specs
https://docs.ceph.com/en/latest/cephadm/services/osd/ - Service management
https://docs.ceph.com/en/latest/cephadm/services/ - Converting an existing cluster to cephadm
https://docs.ceph.com/en/latest/cephadm/adoption/ - ceph-ansible
https://github.com/ceph/ceph-ansible - cephadm-ansible
https://github.com/ceph/cephadm-ansible - ceph-deploy (archived
https://github.com/ceph/ceph-deploy - Rook documentation
https://rook.io/docs/rook/latest-release/ - Rook CephCluster CRD
https://rook.io/docs/rook/latest-release/CRDs/Cluster/ceph-cluster-crd/ - vagrant-libvirt
https://vagrant-libvirt.github.io/vagrant-libvirt/ - Umbrella release notes
https://docs.ceph.com/en/latest/releases/umbrella/